Hello, world! on a Raspberry Pi 4B with RTEMS
An overview of running a “Hello, world!” program on a Raspberry Pi 4B over a serial connection with RTEMS v6.
rtems raspberry piIn this post, I’ll do a basic “Hello, world!” on the Raspberry Pi 4 Model B over a UART connection using the Real-Time Executive for Multiprocessor Systems (RTEMS) project. This article heavily borrows from RTEMS’ quick start guide , as I believe in reading the friendly manual, or RTFM in short.
Setting up the environment #
To develop applications for RTEMS, we need to install the development toolchain along with the kernel. The following steps show how.
Choosing an installation prefix #
In software projects, installation prefix refers to the directory used for
storing built files. I prefer to keep everything related to RTEMS, including
the sources and the built assets, under single folder called $RTEMS_DIR. The
installation prefix falls under this directory. Hence, I define $RTEMS_DIR
and $RTEMS_PREFIX as follows:
export RTEMS_DIR="$HOME/gsoc/rtems"
export RTEMS_PREFIX="$RTEMS_DIR/build/v6"
Obtaining the sources #
The next step involves obtaining RTEMS’ source code. We have two methods to get it: through releases or via the git repositories . As an RTEMS developer, I’ll opt for the git repositories, but users should use the releases for their stability.
# Get the source builder
git clone git://git.rtems.org/rtems-source-builder.git $RTEMS_DIR/rsb

# Get the kernel sources
git clone git://git.rtems.org/rtems.git $RTEMS_DIR/kernel
At the time of writing, git repositories point at v6. Hence, assume this version for the rest of the article.
Installing the tool suite #
For application and kernel development, RTEMS recommends using an RTEMS-specific cross-compiler instead of using the ones provided by the host OS distribution.
To make use of RTEMS’ cross-compiler, we have to build it from source. The RTEMS source builder (RSB) makes this process hassle-free. It serves as a meta build-system which fetches sources and compiles them based on build set recipes. The RSB also plays an indispensable role in the deploying RTEMS projects.
In our case, as we aim to develop applications for a Raspberry Pi 4B with an
ARM64 processor, we can instruct the RSB to build the rtems-aarch64 build
set, which will compile the necessary toolchain for our target platform.
To explore other supported build sets, you may use the command
sb-set-builder --list-bsets.
Also, before proceeding, ensure your host machine fulfils RTEMS’ host requirements .
export RSB_DIR="$RTEMS_DIR/rsb"

# Add source-builder binaries to PATH
export PATH="$RSB_DIR/source-builder:$PATH"

# Fetch and install the tool suite for RTEMS v6 - ARM64
sb-set-builder --topdir=$RSB_DIR/rtems --prefix=$RTEMS_PREFIX/tools 6/rtems-aarch64
This toolchain takes about half-an-hour to compile. If everything goes well, you should see the following output.
RTEMS Source Builder - Set Builder, 6 (8e568b2ca348)
Build Set: 6/rtems-aarch64
Build Set: tools/rtems-default-tools.bset
config: devel/dtc-1.6.1-1.cfg
...
Build Sizes: usage: 6.002GB total: 1.810GB (sources: 215.474MB, patches: 253.198KB, installed 1.599GB)
Build Set: Time 0:28:53.924641
installing: 6/rtems-aarch64 -> <$RTEMS_PREFIX>/tools
clean staging: 6/rtems-aarch64
Staging Size: 1.598GB
Build Set: Time 0:28:59.080027
We will need the toolchain at our fingertips, so add them to the PATH as shown below.
$ export PATH="$RTEMS_PREFIX/tools/bin:$PATH"
Now we can verify that the toolchain works by checking gcc’s version.
$ aarch64-rtems6-gcc --version
aarch64-rtems6-gcc (GCC) 12.2.1 20230425 (RTEMS 6, RSB ac1fee4f04fe5619cca52f960b8ec858adaab7d8, Newlib 9ae9eef)
Copyright (C) 2022 Free Software Foundation, Inc.
This is free software; see the source for copying conditions.  There is NO
warranty; not even for MERCHANTABILITY or FITNESS FOR A PARTICULAR PURPOSE.
Building the kernel #
Now, we’ll build the kernel with support for our board. We do this by enabling
the board support package (BSP) for our board through the kernel config file,
i.e. config.ini.
We can build the kernel in two ways: manually or using RSB. RSB compiles the kernel against upstream source code. I’ll go ahead with the manual route as I have upcoming modifications planned for the kernel. Still, end-users should go for the RSB approach.
$ cd $RTEMS_DIR/kernel

$ # Specify that we want to add support for Raspberry Pi 4B
$ echo "[aarch64/raspberrypi4b]" >config.ini
The config file can affect how a BSP behaves. To keep things simple, I’ve
kept the [aarch64/raspberrypi4b] section empty which means that the compiled
kernel will include our BSP with the default configurations. The BSP
configuration docs contain more details on this topic.
To find the BSP specifier,
aarch64/raspberrypi4bin my case, we can use the command./waf bsplistin the kernel directory ($RTEMS_DIR/kernel). Refer to thebsplistdocs for more details.
Next, we invoke waf to configure, build, and install our kernel.
$ ./waf --prefix=$RTEMS_PREFIX/kernel --rtems-tools=$RTEMS_PREFIX/tools configure
Setting top to                           : <$RTEMS_DIR>/kernel
Setting out to                           : <$RTEMS_DIR>/kernel/build
Configure board support package (BSP)    : aarch64/raspberrypi4b
Checking for program 'aarch64-rtems6-gcc' : <$RTEMS_PREFIX>/tools/bin/aarch64-rtems6-gcc
...
Checking for program 'ar'                 : <$RTEMS_PREFIX>/tools/bin/aarch64-rtems6-ar
Checking for cxx flags '-MMD'             : yes
'configure' finished successfully (0.357s)
$ ./waf
Waf: Entering directory `<$RTEMS_DIR>/kernel/build'
Waf: Leaving directory `<$RTEMS_DIR>/kernel/build'
'build' finished successfully (0.102s)
Waf: Entering directory `<$RTEMS_DIR>/kernel/build'
Waf: Leaving directory `<$RTEMS_DIR>/kernel/build'
'install' finished successfully (0.003s)
Waf: Entering directory `<$RTEMS_DIR>/kernel/build/aarch64/raspberrypi4b'
[   1/1450] Compiling bsps/shared/dev/serial/mc68681_reg.c
[   2/1450] Compiling bsps/shared/dev/rtc/mc146818a.c
...
[1449/1450] Linking build/aarch64/raspberrypi4b/libmghttpd.a
[1450/1450] Linking build/aarch64/raspberrypi4b/testsuites/samples/paranoia.exe
Waf: Leaving directory `<$RTEMS_DIR>/kernel/build/aarch64/raspberrypi4b'
'build_aarch64/raspberrypi4b' finished successfully (30.667s)
$ ./waf install
Waf: Entering directory `<$RTEMS_DIR>/kernel/build'
Waf: Leaving directory `<$RTEMS_DIR>/kernel/build'
'install' finished successfully (0.096s)
Waf: Entering directory `<$RTEMS_DIR>/kernel/build/aarch64/raspberrypi4b'
...
- install <$RTEMS_PREFIX>/kernel/aarch64-rtems6/raspberrypi4b/lib/include/rtems/score/wkspace.h (from cpukit/include/rtems/score/wkspace.h)
- install <$RTEMS_PREFIX>/kernel/aarch64-rtems6/raspberrypi4b/lib/include/rtems/score/wkspacedata.h (from cpukit/include/rtems/score/wkspacedata.h)
Waf: Leaving directory `<$RTEMS_DIR>/kernel/build/aarch64/raspberrypi4b'
'install_aarch64/raspberrypi4b' finished successfully (0.401s)
This whole process took about a minute for me. You may check out the official docs for more insight into the build process.
Building the application #
With the kernel and toolchain built and set up, we can go ahead and start writing the basic “Hello, world!” application to kickstart our RTEMS journey.
Setting up the project #
We’ll use the waf build system to build our application using the
recipes defined in RTEMS’ rtems_waf package.
$ # Create the project dir and cd into it
$ mkdir -p $RTEMS_DIR/apps/hello-world && cd $_

$ # Initialize the project as a git repo
$ git init

$ # Add rtems_waf as a submodule
$ git submodule add git://git.rtems.org/rtems_waf.git tools/rtems_waf

$ # Fetch waf and make it executable
$ curl https://waf.io/waf-2.0.19 >waf && chmod +x waf
Most host OS distributions do not have
wafin their repositories. Hence, RTEMS has a convention to commit thewafbinary to the project as well.
Just as a Makefile contains build recipes for make, waf reads the recipes
from a Python script called wscript. For building our application, we’ll use
a basic waf script as shown below:
import tools.rtems_waf.rtems as rtems


def init(ctx):
    # Initialize RTEMS v6
    rtems.init(ctx, version="6", long_commands=True)


def options(opt):
    # Inherit RTEMS CLI flags
    rtems.options(opt)


def configure(conf):
    rtems.configure(conf)


def build(bld):
    rtems.build(bld)

    bld(
        features='c cprogram',
        target='hello',
        cflags='-g -O2',
        source='src/init.c',
    )
Writing the code #
With the project set up, we can start writing the C source for our application.
RTEMS provides two APIs, namely the classic API and the POSIX API . An RTEMS application can use either of the two APIs, or both. I’ll use the classic API for this article where we express the program through concurrently executed tasks .
The classic API executes a default Init task during boot, responsible for
hardware initialization. In this case, we will leverage this task to send the
UART message, keeping the process simple.
#include <rtems.h>
#include <stdio.h>
#include <stdlib.h>

// We need the clock and UART
#define CONFIGURE_APPLICATION_NEEDS_CLOCK_DRIVER
#define CONFIGURE_APPLICATION_NEEDS_CONSOLE_DRIVER

// There's only going to be one task
#define CONFIGURE_MAXIMUM_TASKS 1

// Initialize the classic API tasks table
#define CONFIGURE_RTEMS_INIT_TASKS_TABLE

// Initialize configuration defaults
#define CONFIGURE_INIT
#include <rtems/confdefs.h>

rtems_task Init(rtems_task_argument ignored) {
    printf("\nHello, world!\n");
    exit(0);
}
This will initialize RTEMS in our application. For further information, refer to the configuration docs .
That about sums up all the code we need for sending a “Hello, world!” over
UART. Note that we have not specified the UART port anywhere here. We don’t
need it as the current BSP uses UART0 for write syscalls. Hence, we can
rest assured that our printf() calls will indeed write to UART0.
Lastly, we can go ahead compile the application as shown below.
$ ./waf
Waf: Entering directory `<$RTEMS_DIR>/apps/hello-world/build/aarch64-rtems6-raspberrypi4b'
[1/2] Compiling src/main.c
[2/2] Linking build/aarch64-rtems6-raspberrypi4b/hello
Waf: Leaving directory `<$RTEMS_DIR>/apps/hello-world/build/aarch64-rtems6-raspberrypi4b'
'build-aarch64-rtems6-raspberrypi4b' finished successfully (0.317s)
Flashing the application #
When we build the application as shown above, we get an ELF binary which an OS can execute. To allow this, the binary includes some metadata headers.
As our application contains the kernel itself, we don’t need an OS to manage
it. The bootloader can directly execute it. Since bootloaders expect assembly
instructions encoded in machine code, we’ll need to strip the ELF metadata and
generate a binary image containing the machine code. We do this using GCC’s
objcopy tool as shown below.
$ aarch64-rtems6-objcopy -Obinary build/aarch64-rtems6-raspberrypi4b/hello build/kernel8.img
This gives us the final binary image which the bootloader on the RPi can
execute. And yes, this also means that we require the bootloader on the board.
The simplest approach involves installing Raspberry Pi OS Lite
using the Raspberry Pi Imager utility. It will partition the SD
card accordingly and install the required firmware in the bootfs partition.
It would be a good idea to boot RPi OS once just to ensure that the board functions as expected.
Now, we mount the SD card’s bootfs partition, copy build/kernel8.img to
bootfs/, and add the following at the end of bootfs/config.txt.
# RTEMS kernel is 64-bit
arm_64bit=1

# UART0 is bound to bluetooth by default, disable it to free UART0
dtoverlay=disable-bt
For further information on the above-stated config, refer to RPi’s
config.txt docs and RTEMS’ raspberrypi4b BSP
docs would help.
Testing #
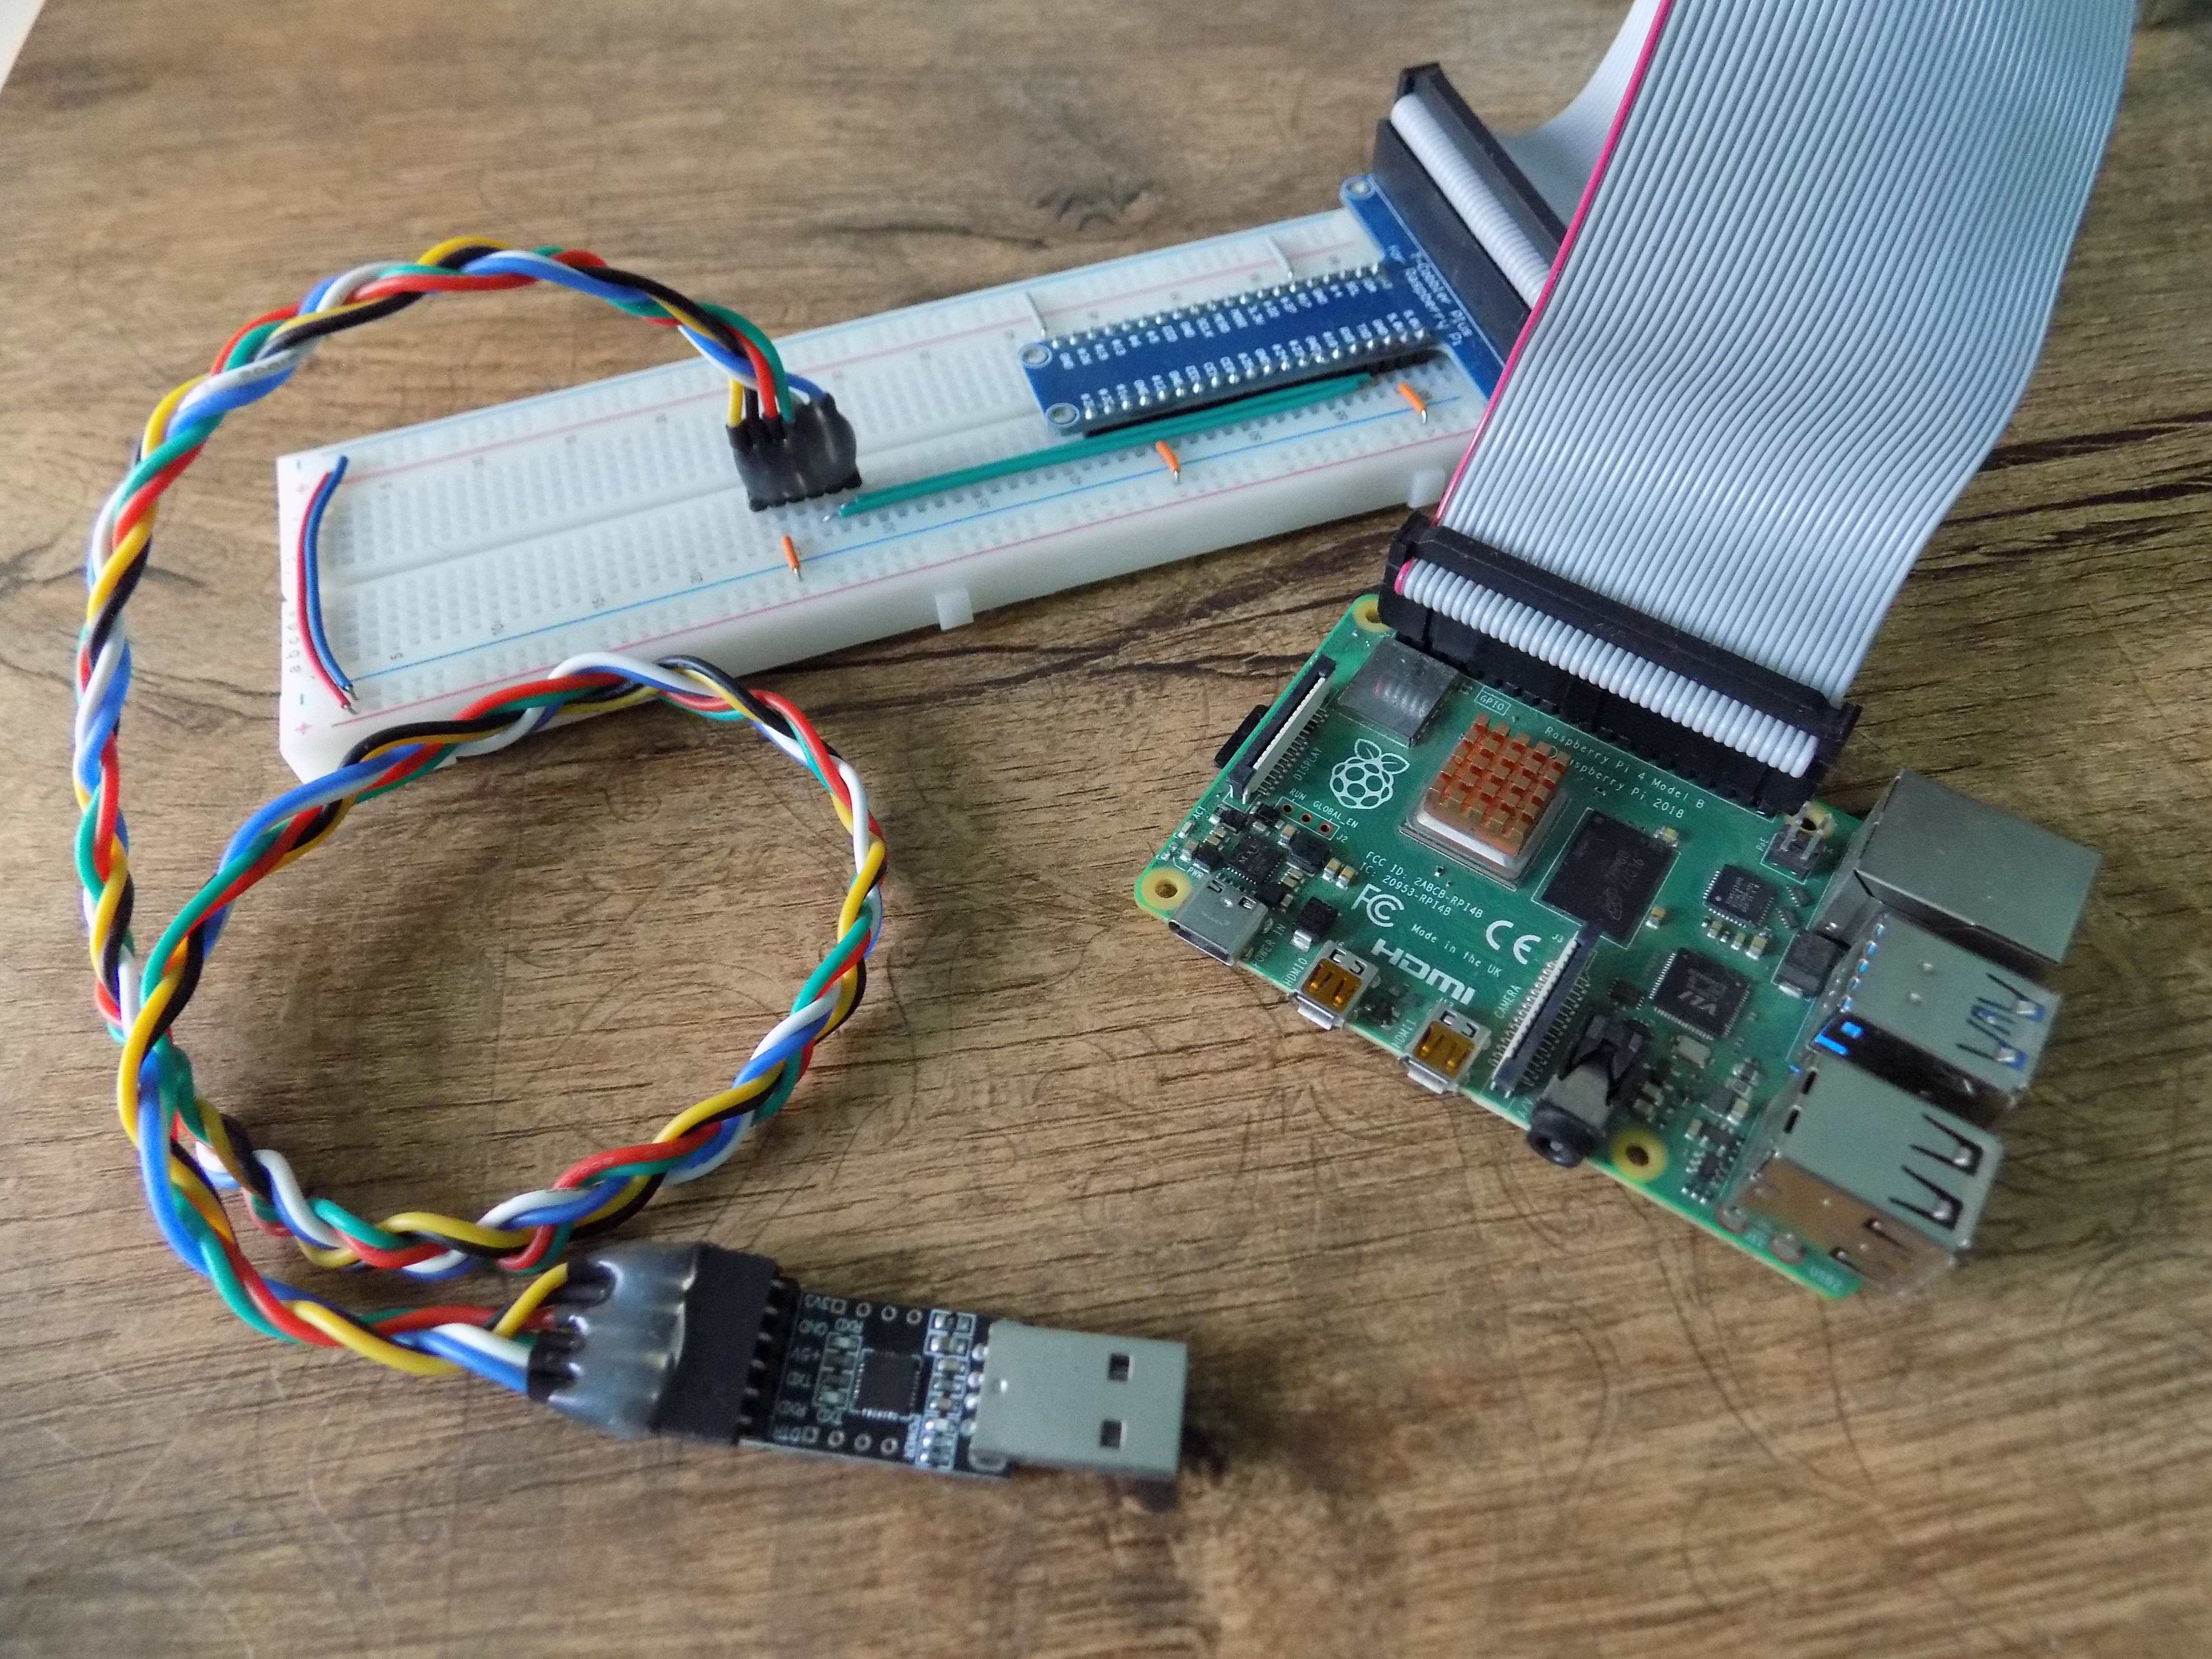
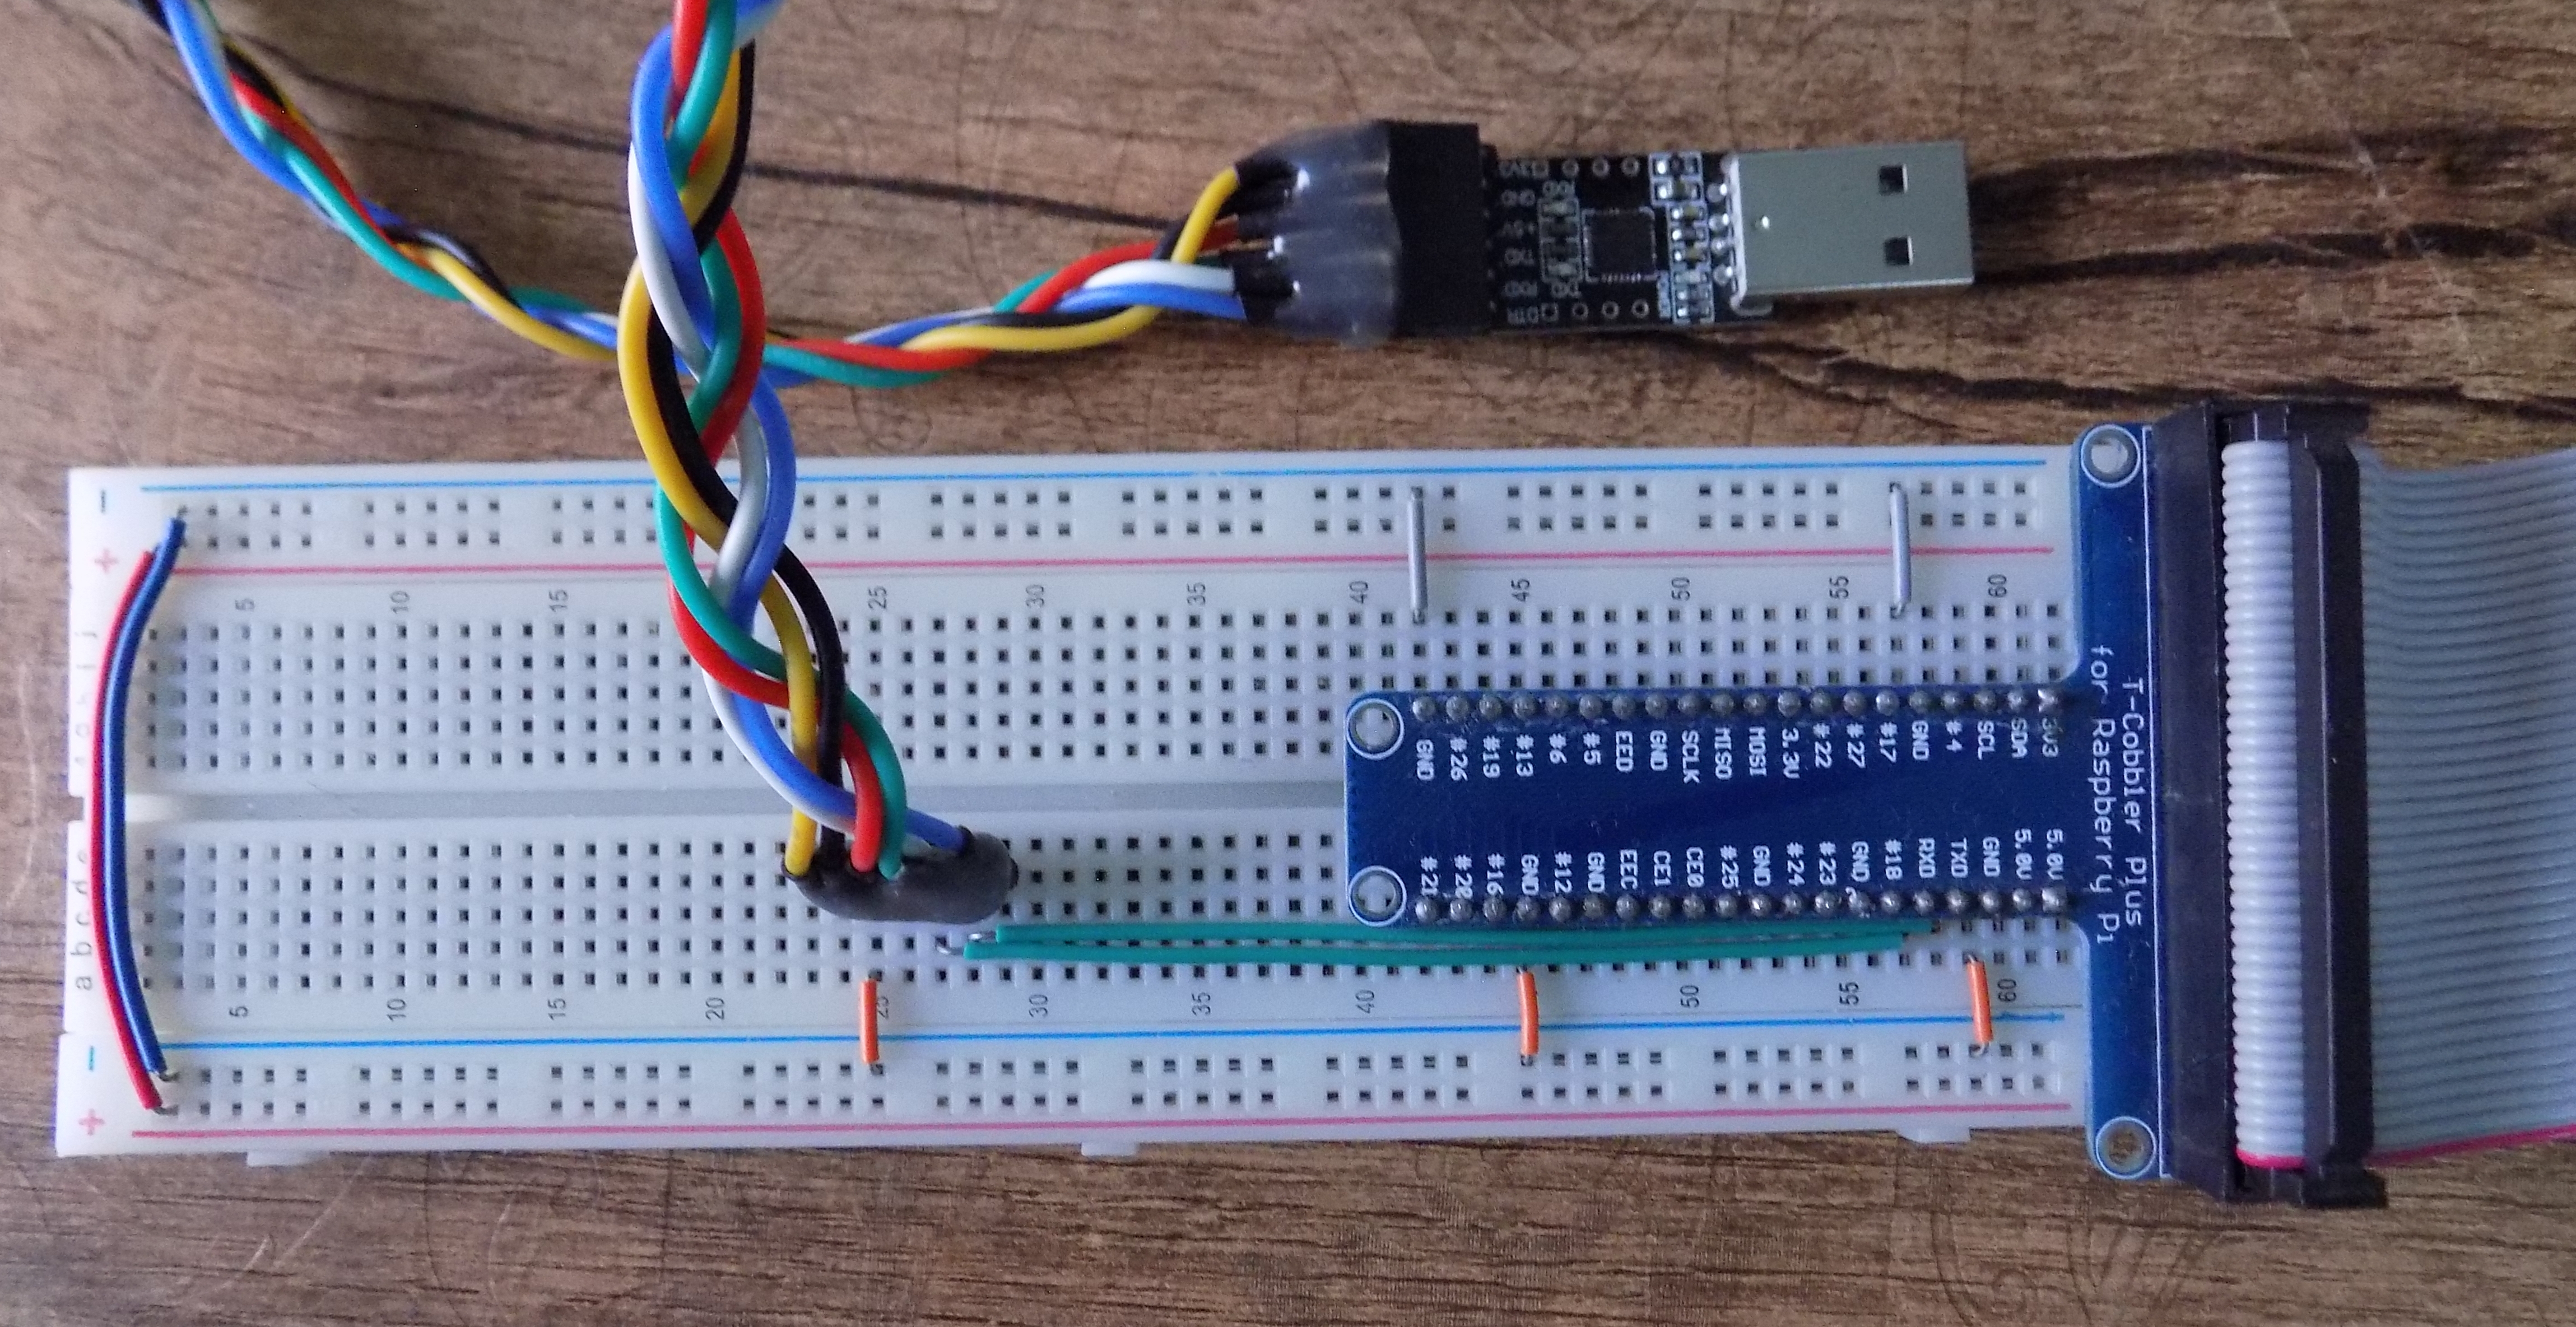
We’ve done everything, and now we profit off of the fruits of our labour. Put the SD card back into the RPi and connect the UART0 pins to a UART adapter, ensuring a shared ground reference.
| Raspberry Pi 4B | UART Adapter | GPIO14 (TX) - Pin 8 | RX |
|---|---|
| GPIO15 (RX) - Pin 10 | TX |
| GND | GND |
To keep things more reliable and hassle-free in the long-term, I used a flat ribbon cable (FRC) with a T-Clobber and a breadboard as shown below.
Now, we start a UART connection with the RPi at 115200 baud, in 8-N-1 mode in
a serial console. I will use picocom and you should see the
following message once the RPi boots up.
Hello, world!

[RTEMS shutdown ]
RTEMS version: 6.0.0.5712f1bac80dc7b953ca15b9862b6a376c3a1836
RTEMS tools: 12.2.1 20230425 (RTEMS 6, RSB ac1fee4f04fe5619cca52f960b8ec858adaab7d8, Newlib 9ae9eef)
executing thread ID: 0x0a010001
executing thread name: UI1
Final remarks #
That concludes this article. I hope this would serve as a good enough starting point for firmware development using RTEMS. You can find the source code for this project on GitHub .
The next article will talk about adding GPIO support to the BSP so that we can do the classic blink program.
Thank you for reading this article, and please feel free to share any suggestions or questions in the comments section.
Comments
Nothing yet.